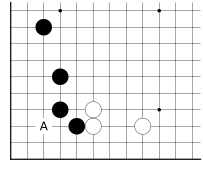
Dia. 1
This is the basic pattern. Both the position of black’s expansion along the left side and the position of the white expansion on the lower side may vary. The important point is the possibility of a white invasion at A.
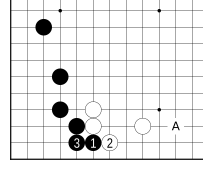
Dia. 2 – secure, but slow
The difference between black securing the corner as shown in this diagram and a white invasion is huge (around 30 points.) However, defending too early slow and gives white opportunities for attack in a different part of the board. An active way to prevent the invasion is to put pressure on white, for example by approaching at A.
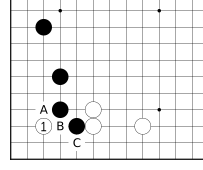
Dia. 3 – invasion
When black misses the opportunity to secure the corner, they can choose to answer at A, B, or C. The first step is to know these options, but more importantly you should know why to pick one over the other.
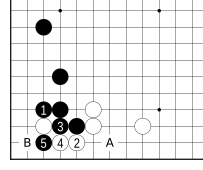
Dia. 4 – endgame
Playing at 1 tries to prevent loosing the corner territory. The sequence ends at 5. Later white has an endgame play at B, and black has a peep at A.
Boss move: White may Tenuki after 2. If playing at A becomes Sente later, they will be able to descend at 5 instead of playing at 4 – which again may spell trouble for black.
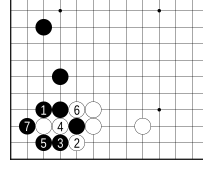
Dia. 5
Instead of 3 in dia. 4 black may play 3. After white ataries at 4 black crawls to 5. Verify on your own that white can’t stretch to 7. Black gets more points than in dia. 4, but white is very thick. Both dia. 4 and 5 are very passive ways of playing and should only be considered, if there is no way to attack white anymore.
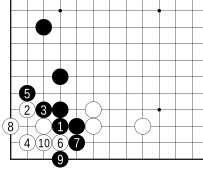
Dia. 6 – passive
Black 1 is a strong answer to white’s invasion. The shown sequence is the best continuation black can expect from this. (If black ataries at 10 white gets even more points.)
Boss move: White may choose to Tenuki after black 1 and treat this as forced exchange (Kikashi). Black 1 is passive and has no influence on the right side. And black will need to play at 3 later, so has to take Gote to prevent white from living in the corner.
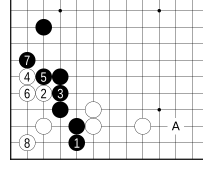
Dia. 7 – tactical
Descending at 1 is the most powerful move black can play. If the white stones on the right side are not yet settled and if black has stones around A, this is the only viable option. White gets to live in the corner, but is weakened on the right side. Black gets a strong wall.
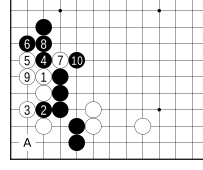
Dia. 8
White may crawl at 1, but in this position the resulting shape is inferior to the one in dia. 7. Black can reduce white to two points with the forcing move at A later.
Dia. 3 again – conclusion
- A is an endgame move. As long as there is potential to fight, it is too passive.
- B is a solid move, but gives white the option to Tenuki.
- C exchanges the corner territory for thickness. If there is a possibility to attack white, this is the only option.